How to Repair a Torn Photograph Digitally: Real Before and After
Updated
See a real torn portrait and its reconstructed result. Learn to preserve the source, prepare a digital copy and check missing edges, faces and handwritten details.
Upload Your Photo To Restore NOW – FREE Preview
Drag & drop or click to select • JPG, PNG, WebP, HEIC
FREE Preview • Review your result before purchasing
To improve the appearance of a torn photograph, preserve the original and work on a digital copy. A digital result can make a tear less visible or fill an absent area, but it does not mend the paper. When image information is missing, the replacement is an interpretation rather than verified recovery.
First distinguish a visible seam from a missing piece. If both sides survive, you have more source information to compare. If part of a face, garment or background is gone, a plausible replacement may still be wrong. The example below makes that uncertainty visible.
Compare a real tear and missing edge
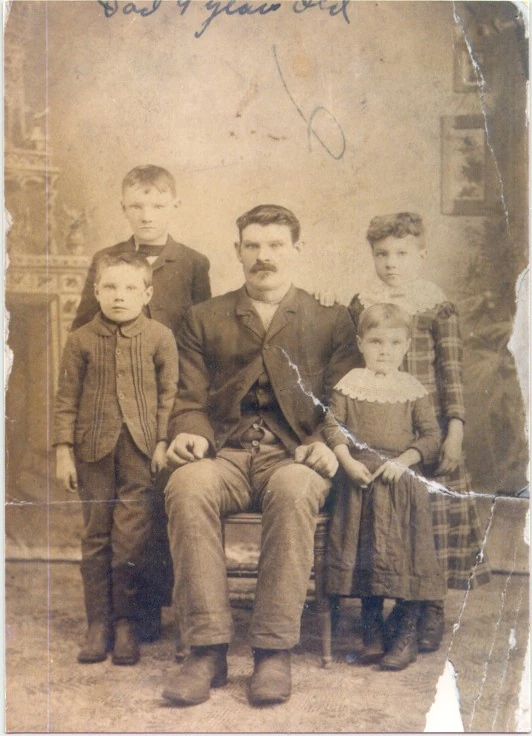
Original scan
AI restoration
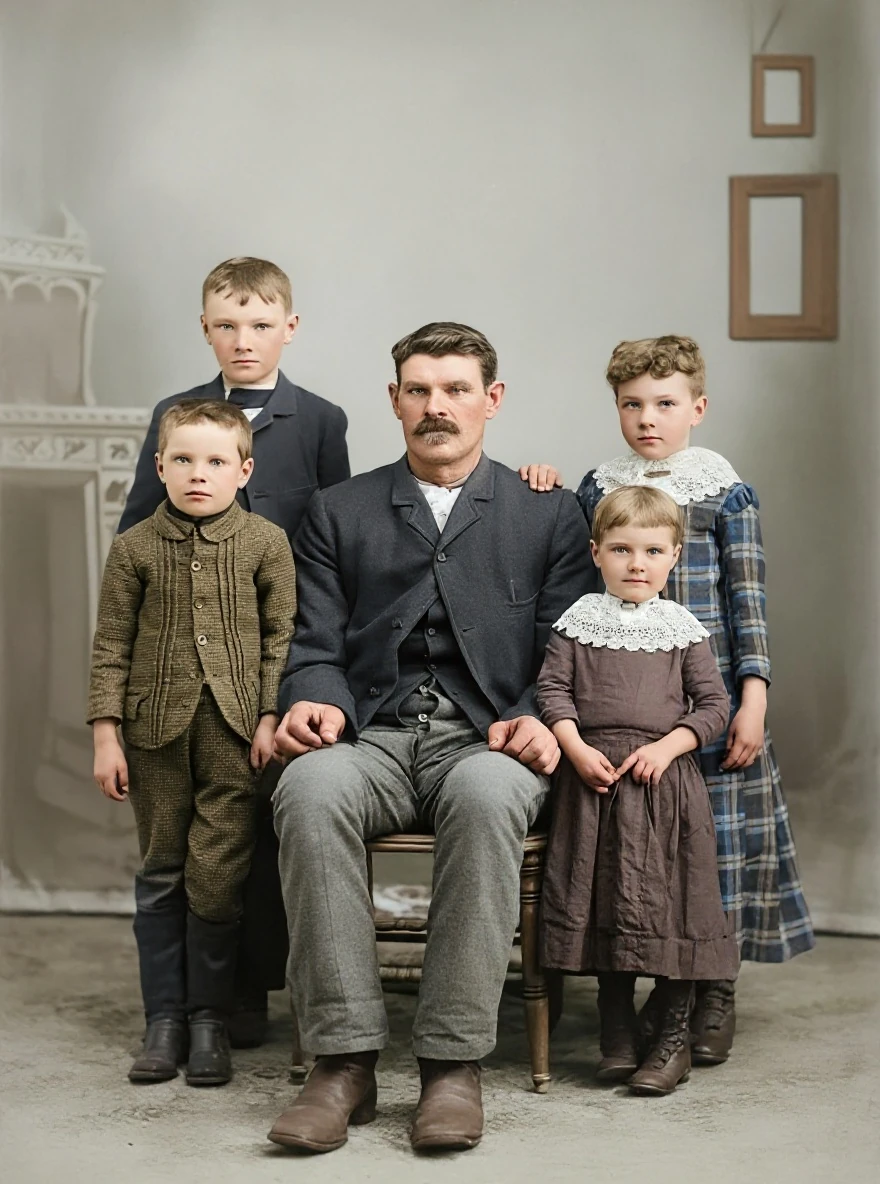
A torn edge in a group portrait · Real customer example
A pale tear runs diagonally through the right side of this group portrait, with a missing white area at the lower edge. The AI result fills these gaps and adds color, while also rebuilding faces, clothing and the studio background. Handwritten marks visible on the original are absent from the result.
What to check: Missing areas, faces, colors and background details are inferred. No identities, relationships, dates or historical accuracy have been established. Keep the original to preserve its handwritten information.
Published with permission. Full framing retained; original and result may have different proportions. Reviewed September 10, 2026.
See the reviewed gallery and more damage types →A pale tear crosses the right side of the original group portrait, and a white gap interrupts the lower edge. The AI result supplies continuous clothing and floor detail in those areas. It also adds color, rebuilds faces and background details, and removes handwritten marks from the original.
The filled areas look more continuous, but the result cannot establish the missing scene, identities, relationships or historical colors. Even surviving facial features can change. The original handwriting is another reason to keep the source: the edited version is not a complete substitute for the photograph as a record.
This pair was visually reviewed and publication permission confirmed. It is a selected demonstration of an existing result, not a guarantee for every torn photograph.
Prepare a digital record before trying restoration
- Keep all surviving information. Retain the print, any separate pieces and an untouched digital copy. Record visible edges and annotations before considering a display crop.
- Capture the source without hiding the gap. Use a clear scan or evenly lit photograph. If separate pieces exist, capture each fully; avoid permanent changes to the original just to prepare an upload. This guide covers digital editing, not adhesive or physical conservation work.
- Choose useful scan settings. Follow the DPI guide for old photographs. A higher-resolution copy may show surviving detail more clearly, but it does not recover an absent piece.
- Identify details that must remain recognizable. Make a short checklist of faces, hands, lettering, clothing and the frame edges. Where available, another trusted photograph can help you assess likeness without treating a new AI feature as evidence.
Preview, then inspect the reconstruction
Try a free preview with a digital copy and compare the available result before deciding whether to continue. Look first at the join: do lines and shapes connect across the damaged area? Then inspect nearby details for duplicated texture, altered proportions or overly smooth transitions.
Review every face, including faces outside the tear. In the group example, a clean gap repair accompanies broader reconstruction. A result can be attractive while changing expressions, garment details or objects in the background.
Check the complete frame and any writing before sharing or printing. Keep the original alongside the restored version, and describe inferred areas honestly. A recreated lower edge should not be presented as a verified view of what was lost.
Choose the next step for your photograph
If all pieces survive, a digital editor can help align copies and make local adjustments while preserving an untouched source. Missing pieces require more judgment; reconstruction cannot confirm their contents. For a photograph kept in remembrance, the memorial restoration guide provides a context for reviewing likeness and presentation.
For related surface damage, see scratch removal and digital crease repair. Compare further examples in the real restoration gallery.
Reviewed by the ImageRestoreAI team on September 10, 2026. A useful display copy can coexist with an unchanged source record.
Ready to try it yourself?
Upload your photo for a free preview. Compare faces, colors and detail before purchasing.
Upload Your Photo To Restore NOW – FREE Preview
Drag & drop or click to select • JPG, PNG, WebP, HEIC
FREE Preview • Review your result before purchasing