Repair Creases in Old Photos Digitally: A Real Example
Updated
Compare a creased drummer photograph with its AI result. Learn how to prepare a scan, review a preview and distinguish digital reconstruction from physical repair.
Upload Your Photo To Restore NOW – FREE Preview
Drag & drop or click to select • JPG, PNG, WebP, HEIC
FREE Preview • Review your result before purchasing
Digital restoration can reduce the appearance of a crease in a copy of a photograph. It does not flatten or mend the original print. Where a fold has interrupted image detail, a smoother result may include reconstructed pixels rather than recovered information.
Begin by deciding what you want to preserve: the pictured scene, the complete print with its border, or both. The example below demonstrates why that distinction matters. Its existing AI output removes the worn border as well as changing detail within the photograph.
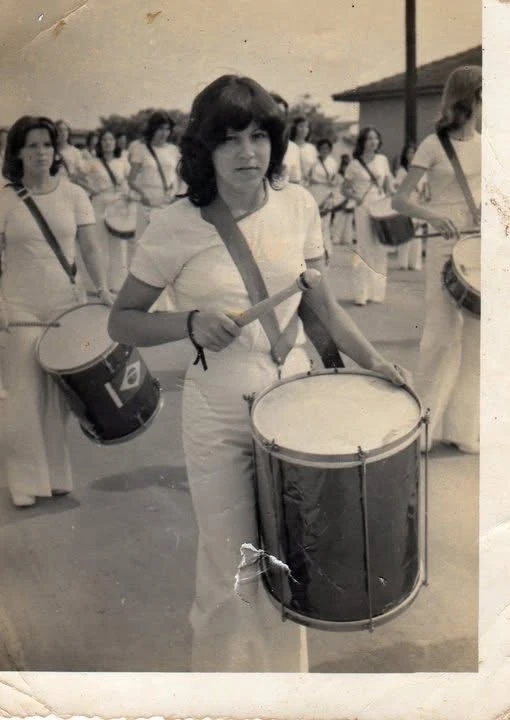
A real photograph with creased corners and abrasion
Original scan
AI restoration
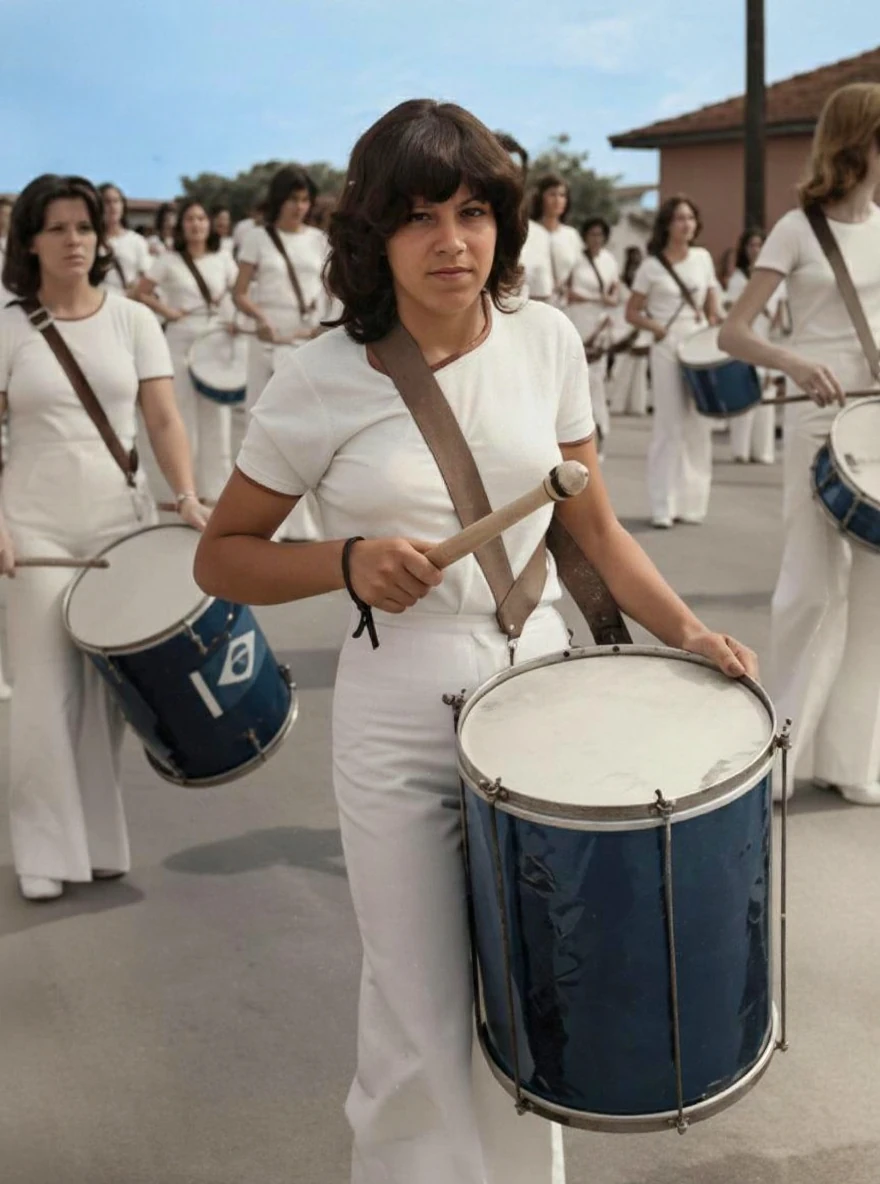
Creases and abrasion in a drummer photograph · Real customer example
The original has folded corners, marks along its pale border and a conspicuous damaged patch beside the foreground drum. These marks are no longer visible in the AI result, which adds color and makes the clothing and drums appear clearer. The original print border is not retained in the output.
What to check: Colors, facial features, drum details and small background elements are reconstructed. Border removal is a change in the product output, not proof that the paper itself was repaired.
Published with permission. Full framing retained; original and result may have different proportions. Reviewed September 10, 2026.
See the reviewed gallery and more damage types →The original drummer photograph has folded corners, a pale worn border and a damaged patch beside the foreground drum. The output no longer shows that patch or the original print border. It adds color and gives clothing and drums more apparent definition.
This supports a narrow, observable conclusion: the visible damage has been replaced in the digital output. It does not prove the original paper was repaired, the new colors are accurate, or the faces and small drum details remain unchanged. Publication permission was confirmed for this reviewed pair; it is a selected example, not a measurement of typical results.
Prepare the source before editing
- Retain an untouched copy. Keep the complete scan, including borders or written information that may be useful later. Give edited versions separate filenames.
- Capture the fold clearly. Scan or photograph the print with enough detail to see the damaged line and surrounding image. Aim for even illumination and avoid reflections. Do not force a fragile print flat to imitate an undamaged surface.
- Choose scanning settings for your source. The scanning DPI guide explains how to think about print size and useful detail. Extra pixels alone cannot supply information missing along a fold.
- Mark your comparison priorities. A crease through a blank background poses a different review problem from one crossing an eye, a hand or a patterned garment. Note these areas before looking at the result.
Use a preview as a comparison step
Upload a digital copy for a free preview. Compare the available output with your saved original before deciding whether it is suitable for your purpose. No single example can establish how a different photograph will look.
Start around the crease: does the repaired area connect naturally with both sides? Check clothing seams, straight edges and repeated patterns. Watch for a new shape that looks convincing but differs from the surviving source detail. Then inspect faces and hands outside the original damage too; reconstruction can affect areas you did not intend to change.
Finally, compare the full frame. In this example, the border is absent from the result. If that border matters to you, keep the full original alongside the edited image. A cleaner presentation and preservation of the complete print are separate goals.
When another approach deserves a look
For a small crease, local editing on a duplicate layer can give you more control over where changes occur. It still relies on decisions about nearby texture, and it cannot verify missing features. For an important likeness, compare with another trusted photograph if one is available.
See scratch and crack removal for branching surface damage, or torn-photograph restoration when part of the image is missing. The complete before-and-after gallery keeps the full sources and limitations visible.
Reviewed by the ImageRestoreAI team on September 10, 2026. Preserve the original print and scan even when you prefer the edited version for display.
Ready to try it yourself?
Upload your photo for a free preview. Compare faces, colors and detail before purchasing.
Upload Your Photo To Restore NOW – FREE Preview
Drag & drop or click to select • JPG, PNG, WebP, HEIC
FREE Preview • Review your result before purchasing